


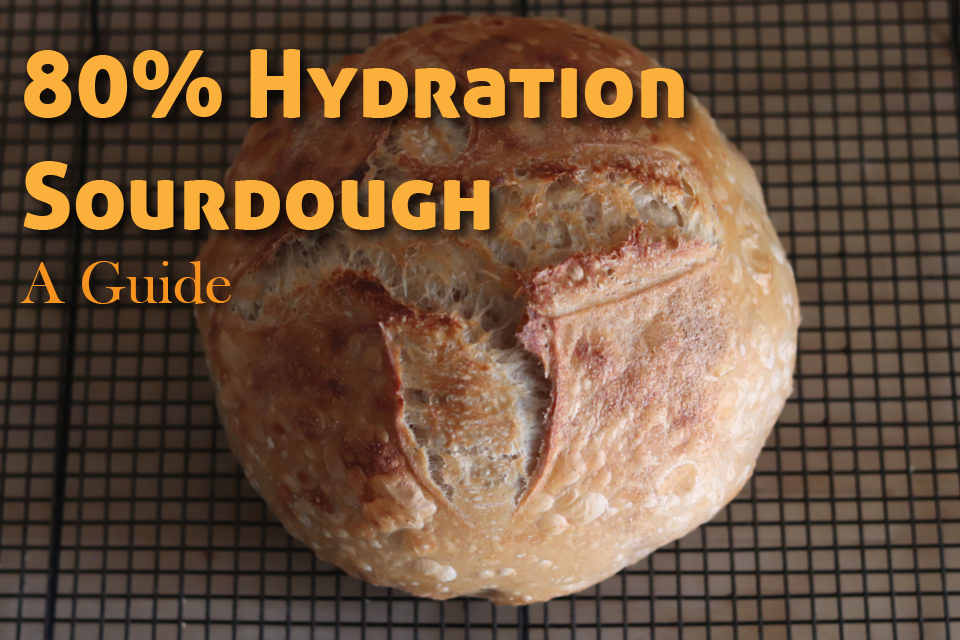
80% hydration sourdough bread dough can be a bit intimidating. It is wetter than what you might be used to, but with a bit of practice and patience, it will bring your sourdough up to another level of baking skill.

When I started making sourdough, even 70% hydration (or moisture in the dough) seemed like it would be way too wet of a dough to handle. But over time, I began to be brave and play with the amount of liquid I would put into the dough. Lately, I have upped the hydration level to 80% with excellent results. With the higher level of moisture, loaves usually get slightly bigger holes but superior texture. It is also ideal for making focaccia or pizza.

I decided to rewrite my guide to making sourdough using an all-white flour and slightly above 80% hydration version. You will see many recipes for using 80% or more hydration as a goal or holy grail. I have seen people do a 100% hydration. That is pretty wet! Yes, this recipe is very long. Don’t be intimidated. I purposely wrote out as much of the directions for someone who hasn’t done it before.

I baked up a boule and a batch of focaccia for this post (recipe for the focaccia next week!), and they came out perfect. The flavor was fantastic and nice and sour, for New Jersey, that is! It is physically impossible to get as sour as the San Francisco sourdough bread I grew up with and love. The natural yeasts in The Bay Area have more sour flavor than anywhere else in the world. Even if you got a sourdough starter from a friend in San Francisco within 3 weeks, your starter would be taken over by the natural yeasts in the air where you live. The wild yeast can vary even by just a few miles. So everyone’s sourdough starter has a different character.

If you need to buy a dutch oven I use this one from amazon and is a great all around dutch oven and is half the price of a lodge and 3 times cheaper than a Le Creuset and is just as beautiful. You can find the raising baskets here also from Amazon. and the Lame for slashing the loaves is here. I get a tiny commission at no cost to you if you use the links. This bread knife from has become my favorite knife it is so sharp and makes cutting bread a dream. It’s not cheap but it is worth every penny.

In the next few weeks, I will be doing a complete guide on making your own starter from scratch. As my beloved starter had an unfortunate accident during a move, and I need to start a new one. Funny, I was upset just for a moment. I have wanted to do a post on starter a new sourdough starter, and this is the perfect opportunity. I have moved to a completely different climate and altitude, so it will be fun to see the difference. Let me know in the comments below or feel free to email me what2munch@gmail.com with any questions you have about sourdough baking, I would love to help.


- 1 Active Sourdough starter
- 800 grams bread flour
- 200 grams all-purpose flour
- 800 grams water at room temperature
- 15 grams or 1 tablespoon sea salt
- 150 grams of the active fed sourdough starter
-
The Night before or in the early morning
-
Feed your starter about 6 – 8 hours before you want to start the dough process. Let sit in a cool place.
-
Simultaneously, mix together in a very large bowl or plastic tub the bread flour, the all-purpose flour, and the water. Do not use a metal container.
-
Note: This is called autolyze and will help develop some incredible flavor. Most recipes call for a couple of hours, but my friend Erin @brooklynsourdough taught me recently to have a very long autolyze. She mixes the flour and water at the same time as she feeds her starter the final feeding.
-
When your starter has doubled or more and is bubbly. It may look like it has fallen in on itself. That is ok too. Measure out 150 grams and add it to the flour mixture.
-
Using your hands to really get in there and mix it to thoroughly combine.
-
Sprinkle the sea salt over the rough dough, and with your hands again, squeeze with your fingers and mash it until you can feel the salt crystals have dissolved. This may take a couple of minutes. You do not need to actually knead the dough; just make sure it has been thoroughly mixed. Lift an edge and pull the dough over to the other side. Turn a quarter and repeat three more times to start to form a ball. All you need to do is once for now.
-
Scrape down the sides of whatever container you are using and cover with a lid or plastic wrap.
-
Let rest for 30 minutes or so. You can extend this to 45 to 50 if your schedule needs it.
-
Uncover the bowl and grasp one edge of the rested dough. Grab one edge and pull up and stretch out the dough several inches above the surface. Bring the dough over and push it down towards the further edge. Turn the bowl ¼ and repeat, stretching the dough again. Continue this until you have come full circle. The dough should have gathered into a rough ball.
-
Cover again and let rest for another 30 minutes.
-
Repeat the folding process 3 more times. Each time the ball of dough will start out looking very flat and loose. But it will tighten more and more with each fold. The final time the ball of dough will look very smooth, and the dough will have a lot of elasticity. It will gather into a nice tight ball.
-
Let the dough rest and rise until more than doubled with large bubbles very visible. It will take 5-6 hours in total from the first mix with the starter and the salt.
-
Have 2 round baskets lined with clean tea towels ready. You can sprinkle some flour over them. If you shape firmly enough, you will find that you don’t need very much at all. Or you can buy baskets with linen liners. See whattomunch.com for a link.
-
If you are making focaccia or pizza as part, or all of the dough. Lightly sprinkle some olive oil into plastic bags big enough to hold the balls of dough.
-
Scrape the bread dough onto a floured work surface.
-
Divide the dough into 2 equal pieces. Roughly gather them each into a ball and let rest for 10 – 15 minutes. Or you can divide the dough into 1 ball for a boule and one for focaccia or divide it into 4 balls to make pizza. Or any combination.
-
Using a dough scraper, pull the dough toward you onto a clean surface area. Using the tension and a slight circular motion continue to turn the ball until it forms into a tight ball. You should see many bubbles underneath the surface.
-
Turn the dough, smooth side down into one of the prepared baskets. Pinch together the dough if there are and ragged surfaces. Or place the balls into the oiled plastic bags.
-
Repeat with the second ball of dough.
-
Sprinkle a little flour over the tops of each loaf.
-
Cover with plastic wrap.
-
Let sit in the refrigerator for 24-48 hours. I have found the best for sour flavor is in the 36-hour area. But it all depends on your need and timing. To get the fantastic blisters, it needs to retard for at least 24 hours or longer.
-
About 1 hour before you want to bake, place 2 dutch ovens in a cold oven with the lids askew. Let the oven heat for one full hour at 450, depending on you oven I have heated to 500. But you need to watch how quick the bread browns at that temp.
-
Cut 2 parchment paper rounds approximately 12 inches across. Thoroughly crumple and wet under a running faucet. Place one down on a work surface smooth it out. Or you can use a turntable, which will make slashing it easier if you want to be fancy.
-
Unmold one of the loaves onto the center of the wet parchment paper.
-
Quickly slash the loaf.
-
Using oven mitts, carefully remove one of the dutch ovens and place it on a heatproof surface.
-
Lift the slashed loaf by the parchment paper and carefully place it into the hot dutch oven. Using an oven mitt, Immediately place the hot lid on to the filled dutch oven and put it into the hot oven.
-
Quickly repeat with the second loaf.
-
Bake covered in the oven for 20 minutes.
-
Uncover the dutch ovens and bake for an additional 20 – 25 minutes. The bread should be deeply golden and sound hollow when tapped. Unmold onto a rack and remove the parchment paper.
-
Let cool completely before slicing if you can wait that long. It will slice easier.

4 thoughts on “80% hydration sourdough a How to Guide”
What temperature do you use to bake the bread?
Hi oops I missed that ☺️ Heat your oven to 450. Thanks for catching that!
When do you add the water
Oops thanks for cathcing that! You add the water with the flours and let it sit as long as the starter is growing. I fixed it in the recipe.
Comments are closed.