


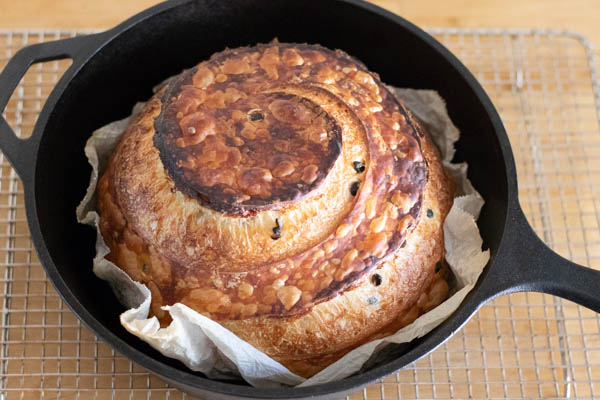
Lemon and capers sourdough bread , tangy with hints of lemon and little balls of capers adding salty goodness!
A stage manager friend at The Lion King and I were talking about what flavors of sourdough would be fun to bake up. I’m always trying to come up with some interesting combinations just to mix things up. She and I came up with capers; I added lemon rind and voila! Lemon and Capers Sourdough was born.

This sourdough is fantastic. There is a nice flavor of capers throughout and just the hint of lemon to balance the flavor out. Since brined capers are little balls of concentrated salt and acid that can take ho-hum dishes to new heights, it’s what makes chicken Piccata so delicious. Adding capers to this sourdough is like adding little flavor bombs of goodness. With subtle almost lemon flavors in the capers, the addition of lemon rind brought the citrus flavor out even more too.

Capers are actually buds of a shrub. They are grown in arid and semi-arid climates where humidity is low, mostly Spain, Italy, and parts of Africa. The buds are picked in the morning, as they are most tender in the early hours of the day. They are usually packed with an acid and loads of salt and then jarred.

To me, sourdough baking is definitely one of my biggest passions in life. Sharing a warm loaf of freshly baked sourdough with someone is like giving them a loving hug. I put so much into my bread baking even after so many years. It still gives me pleasure and joy. My neighbors and my friends, especially at The Ling King all are well aware of my sharing of this gift of baking I have. Word quickly spreads every time I bring a loaf to work, and I get people scampering up to the puppet shop or the sound room where I usually drop it off. I try to time it, so it is still warm by the time I get the still warm loaves onto the train from Millburn and into the theater. It can be tricky to time that out. But I seem to have figured it out. If you retard the dough in the fridge, the actual baking can be done at your schedule. You need to leave yourself about 2 hours of time, but most of that is inactive time where the oven is heating, or the bread is baking. After about 15 minutes of cooling on a rack I have been known to place the still warm loaves into open paper bags, and they will continue to cool as I transport them off to The Lion King. Though I sometimes wonder if I am driving the people on the train crazy with the smell of still cooling Sourdough bread…lol. I’ve updated my sourdough directions for this recipe as an on going refining of how to bake the perfect loaf of sourdough

This Lemon and Caper Sourdough would be a great addition to any dinner, especially a roast chicken. It also makes incredible sandwiches. A friend at work suggests using it in a grilled cheese with a smoky cheese! I bet that would be incredible!

A note on why I use weights instead of cups to measure out for sourdough: I find that it is much more accurate to measure flour this way particularly in bread baking as the humidity and other factors seem to have a significant effect. I have consistent results when I weigh everything out. If you want to have cup measurements I have added them as notes. If you need to buy rising baskets here are some from Amazon ( I get a small little commission if you buy from this link or from the adds on this site, please consider using the links) And here is the turn table if you want to spin the dough to get great scoring here.That turntable is heavy but really useful for many things!

- 1 Active Sourdough starter
- 800 grams bread flour a little under 7 cups
- 200 grams all-purpose flour a little over 1 ½ cups
- 750 grams water at room temperature about 3 cups
- 1 tablespoon finely grated lemon rind from about 1 lemon
- ½ cup drained capers
- 1 tablespoon sea salt or I use Pink Himalayan salt
- 150 grams fed sourdough starter
-
Feed your starter about 6 – 8 hours before you want to start the dough process. Let sit in a cool place, either overnight or starting early in the morning.
-
At the same time mix together in a large bowl or plastic tub the bread flour, the all-purpose flour and the water. Do not use a metal container. It will react with the sourdough starter.
-
When your starter has doubled or more, and is bubbly, it may look like it has fallen in on itself that is ok too. Measure out 150 grams and add it to the flour mixture.
-
Using your hands, really get in there and mix it to thoroughly combine.
-
Sprinkle the sea salt over the rough dough and add the lemon rind. With your hands again squeeze with your fingers, mash, and knead it until you can feel the salt crystals have dissolved. This may take a couple of minutes. You do not need to actually knead the dough into a ball, just make sure it has been thoroughly mixed.
-
Scrape down the sides of whatever container you are using to incorporate it into the dough and cover with a lid or plastic wrap.
-
Let rest for 30 minutes or so. You can extend this to 45 - 50 minutes if your schedule needs it.
-
Have a bowl of water handy to wet your hands during the folding process.
-
Uncover the dough, wet your hands with the water, and grasp one edge of the rested dough. Pull up and stretch out the dough several inches above the surface. Bring the dough over and push it down towards the further edge. Turn the bowl ¼ and repeat, stretching the dough again. Continue this until you have come full circle. The dough should have gathered into a rough ball. The water helps the dough from sticking to your hands and adds a bit more moisture.
-
Cover again and let rest for another 30-45 minutes.
-
Add in the drained capers before you do the next fold. It will incorporate with the remaining folds.
-
Repeat the folding process 3 more times. Each time the ball of dough will start out looking very flat and loose, but it will tighten more and more with each fold. The final time the ball of dough will look very smooth, and the dough will have a lot of elasticity. It will gather into a nice tight ball.
-
Let the dough rest and rise until more than doubled with large bubbles very visible. It will take 5-6 hours in total from the first mix with the starter and the salt.
-
Have 2 round baskets lined with clean tea towels ready. You can sprinkle some flour over them if you want. Though I have found if you have shaped nice and tight loaves, you will not need to flour them at all. If you shape firmly enough, you will find that you don’t need very much at all.
-
Scrape the bread dough onto a floured work surface.
-
Divide the dough into 2 equal pieces. Roughly gather them each into a ball and let rest for 10 – 15 minutes.
-
Using a dough scraper pull the dough toward you onto a clean surface area. Using the tension of pulling with the dough scraper, and a slight circular motion continue to turn the dough ball ¼ turns and pulling towards you, using the scraper, until it forms into a tight ball. You should see many bubbles underneath the surface.
-
Turn the dough, smooth side down into one of the prepared baskets. Pinch together the dough if there are any ragged surfaces.
-
Repeat with the second ball of dough.
-
Sprinkle a little flour over the tops of each loaf.
-
Wrap each filled basket with plastic wrap and let sit for 1 hour if you have time. If you don’t, you can do the same hour at the end while the oven is heating. The loaves will not be as easy to slash this way, but if you are not trying to be perfect, it works on either end of the retarding process.
-
Let sit in the refrigerator for 24-48 or even up to 72 hours. I have found the best for sour flavor is in the 48-72 hour area. But it all depends on your need and timing. To get the fantastic blisters, it needs to retard for at least 24 hours or longer.
-
About 1 hour before you want to bake, place 2 dutch ovens in a cold oven with the lids askew. Let heat for 500° one full hour. If you did not let the dough rise for an hour pull it out at the same time. If you did let it rise for an hour pull the loaves out when you are ready to bake. (#note from 2020 I find you actually don't need to let it rise after the retard just bake it!)
-
Cut 2 parchment paper rounds approximately 12 inches across. Thoroughly crumple the paper. Wet the paper under running water. Place one of the wet paper circle onto your work surface, smooth it out. Or you can use a turntable which will make slashing it more manageable if you want to be fancy.
-
Unmold one of the loaves onto the center of the wet parchment paper.
-
Quickly slash the loaf.
-
Using oven mitts carefully remove one of the dutch ovens and place it on a heatproof surface.
-
Lift the slashed loaf by the parchment paper and carefully place it into the hot dutch oven. Using an oven mitt, Immediately place the hot lid on to the filled dutch oven and place into the hot oven.
-
Quickly repeat with the second loaf.
-
Bake covered in the oven for 20 minutes. Reduce the oven temperature to 450°
-
Uncover the dutch ovens and bake for an additional 20 – 25 minutes. The bread should be deeply golden possibly even dark brown on the edges and sound hollow when tapped. Unmold onto a rack and remove the parchment paper.
-
Let cool completely before slicing, if you can wait that long. It will slice easier.
After about 15 minutes you can transport the hot loaves in paper grocery bags if you want to travel. They will cool in the babs if they are left to breathe so don't close the tops of the bags.
One thought on “Lemon and Capers Sourdough will Elevate Your Bread Baking to New Heights”
Comments are closed.