


I’m trying something different with this post. This guide to Baking Sourdough Bread will be an ongoing post, and I will update as I go along on my discoveries. So check back here for updates on what I have done.

I have been baking sourdough bread for more years than I can remember, through many different periods in my life, both ups and down. The baking of bread has been a comfort when I’m troubled and excitement when I’m at my most happy. I would call it my therapy. When I’m in the baking zone, I can think calm and clearly without all the swirling dramas or distractions that my theater world can cause.

Not to say I have not had my disasters and failures, believe me, I have had giant hockey pucks and horribly misshapen loaves of what might resemble some alien blob from a horror movie. But the absolute joy I get from the look on a good friend or someone new who bites into one of my, still warm from the oven, big loaves of chewy and yet crisp-crusted sour goodness. Watching the change in expression from interest to pure bliss when they realize how tangy and tasty a good loaf of sourdough bread can be. Tasting one of my loaves is like a welcoming conversation, like me saying “hi this is what I am.” I feel like I am welcoming someone to taste my very soul. If you understand that, then you and I should be friends. That is how much of a passion I have for baking sourdough.

There are many steps and yes it takes time and patience, but I feel the rewards for baking sourdough bread are many. That doesn’t mean you have to be actively involved in the process for more than a few minutes at a time. Unlike most baking, you can fudge the times a bit. And it doesn’t have to be precise. If you don’t make it precisely for the time of each fold, for example, it is not going to hurt if you extend the time from 30 minutes to 50. Sourdough bread baking is more of a sense of when it is right. I have included exact measurements here in the recipe. But as you get more experienced at it, you will understand it is really by the feel, at least at home where you can’t control the environment. The amount of flour can vary with the weather and the time it takes for things to rise or your starter to be fully active will depend significantly on the humidity and the temperature.

At some point I will go into how to start your own starter, but for now I bet you have a friend somewhere who has one lurking in his or her refrigerator, ready to go forth and multiply. Make sure you have fed the starter regularly for it to be active and bubbling along. If it has been dormant in the fridge for more than a week, feed it for several feedings – every 12 hours should do it. If you are interested in starting your own, Nancy Silverton’s bread baking book has an excellent starter recipe using organic grapes to get the starter going. It is what I have used, and it is excellent.

I have changed my method many times over the years, and this is my current method. My friend @brooklynsourdough has taught me a few things that I will share as I go along. If you haven’t seen her work on Instagram, you should definitely check her out. Her artistry is impressive, and I can only hope to get to her level someday.

To achieve amazing crust on sourdough, one of the easiest methods is to use dutch ovens to bake the bread in. If you do not have a couple of dutch ovens lying around, you can use bread pans, a baking stone, or a baking steel, The Steel I love and have had great success with. To let the shaped loaves rise I use baskets that are about 8 inches across and 4 ½ inches deep. You could use bowls that are about the same dimensions. I line the baskets with tea towels that are sprinkled with a little flour. I have used reed baskets that are sprinkled with flour. But I now find that the towels make unmolding the risen loaves much easier. Parchment paper also makes moving the dough much easier. You could place the risen dough directly into the hot dutch ovens, but the paper just makes it all easier.

AS to the sourness of the bread, I think I have gotten to a good place. Some people don’t like thier bread very sour, I’m not one of those! It will never be as sour as my beloved San Francisco sourdough. That is impossible as the natural yeast in the air of each part of the world is different and it is sourer there than anywhere I know. I will always yearn for the incredible bread of the Bay Area and my childhood where I could not ever get enough of it.

a basic sourdough bread recipe
- 1 Active Sourdough starter
- 600 grams bread flour
- 300 grams all purpose flour
- 100 grams whole-wheat flour
- 700 grams water at room temperature
- 1 tablespoon sea salt
- 150 grams of the active fed sourdough starter
-
Feed your starter about 6 – 8 hours before you want to start the dough process. Let sit in a cool place.
-
At the same time mix together in a very large bowl or plastic tub the bread flour, the all-purpose flour and the whole-wheat flour. Do not use a metal container.
-
Note: This is called autolyze and will help develop some incredible flavor. Most recipes call for a couple of hours, but my friend @brooklynsourdough taught me recently to have a very long autolyze.
-
When your starter has doubled or more, and is bubbly. It may look like it has fallen in on itself that is ok too. Measure out 150 grams and add it to the flour mixture.
-
Using your hands really get in there and mix it to thoroughly combine.
-
Sprinkle the sea salt over the rough dough and with your hands again squeeze with your fingers and mash it until you can feel the salt crystals have dissolved. This may take a couple of minutes. You do not need to actually knead the dough just make sure it has been completely mixed.
-
Scrape down the sides of whatever container you are using and cover with a lid or plastic wrap.
-
Let rest for 30 minutes or so. You can extend this to 45 to 50 if your schedule needs it.
-
Uncover the dough and grasp one edge of the rested dough. Pull up and stretch out the dough several inches above the surface. Bring the dough over and push it down towards the further edge. Turn the bowl ¼ and repeat, stretching the dough again. Continue this until you have come full circle. The dough should have gathered into a rough ball.
-
Cover again and let rest for another 30 minutes.
-
Repeat
-
the folding process 3 more times. Each time the ball of dough will start out looking very flat and loose, but it will tighten more and more each fold. The final time the ball of dough will look very smooth, and the dough will have a lot of elasticity. It will gather into a nice tight ball.
-
Let the dough rest and rise until more than doubled with large bubble very visible. It will take 5-6 hours in total from the first mix with the starter and the salt.
-
Have 2 round baskets lined with clean tea towels. You can sprinkle some flour over them. If you shape firmly enough, you will find that you don’t need very much at all.
-
Scrape the bread dough onto a floured work surface.
-
Divide the dough into 2 equal pieces. Roughly gather them each into a ball and let rest for 10 – 15 minutes.
-
Using a dough scraper pull the dough toward you onto a clean surface area. Using the tension and a slight circular motion continue to turn the ball until it forms into a tight ball. You should see many bubbles underneath the surface.
-
Turn the dough, smooth side down into one of the prepared baskets. Pinch together the dough if there are and ragged surfaces.
-
Repeat with the second ball of dough.
-
Sprinkle a little flour over the tops of each loaf.
-
Wrap each filled basket with plastic wrap and let sit for 1 hour if you have time. If you don’t, you can do the same hour at the end while the oven is heating. The loaves will not be as easy to slash this way, but if you are not trying to be perfect, it works on either end of the retarding process.
-
Let sit in the refrigerator for 24-48 hours. I have found the best for sour flavor is in the 36-hour area. But it all depends on your need and timing. To get the amazing blisters, it needs to retard for at least 24 hours or longer.
-
About 1 hour before you want to bake, place 2 dutch ovens in a cold oven with the lids askew. Let heat for one full hour. If you did not let the dough rise for an hour pull it out at the same time. If you did let it rise for an hour pull the loaves out when you are ready to bake.
-
Cut 2 parchment paper rounds approximately 12 inches across. Thoroughly crumple and wet under a running faucet. Place one down on a work surface smooth it out. Or you can use a turntable which will make slashing it easier if you want to be fancy.
-
Unmold one of the loaves onto the center of the wet parchment paper.
-
Quickly slash the loaf.
-
Using oven mitts carefully remove one of the dutch ovens and place it on a heatproof surface.
-
Lift the slashed loaf by the parchment paper and carefully place it into the hot dutch oven. Using an oven mitt Immediately place the hot lid on to the filled dutch oven and place into the hot oven.
-
Quickly repeat with the second loaf.
-
Bake covered in the oven for 20 minutes.
-
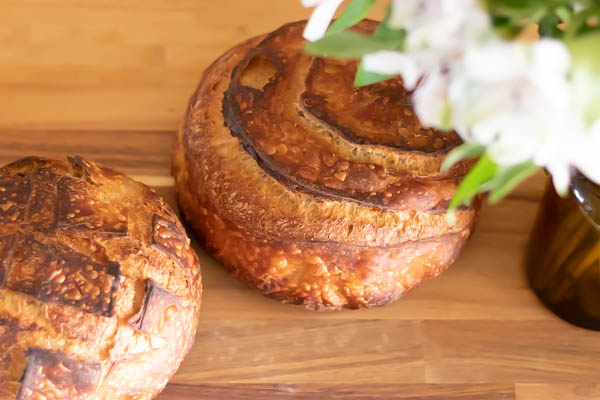
Uncover the dutch ovens and bake for an additional 20 – 25 minutes. The bread should be deeply golden and sound hollow when tapped. Unmold onto a rack and remove the parchment paper.
-
Let cool completely before slicing, if you can wait that long. It will slice easier.


One thought on “My Sourdough Guide to making very sour delicious loaves of bread”
Comments are closed.