


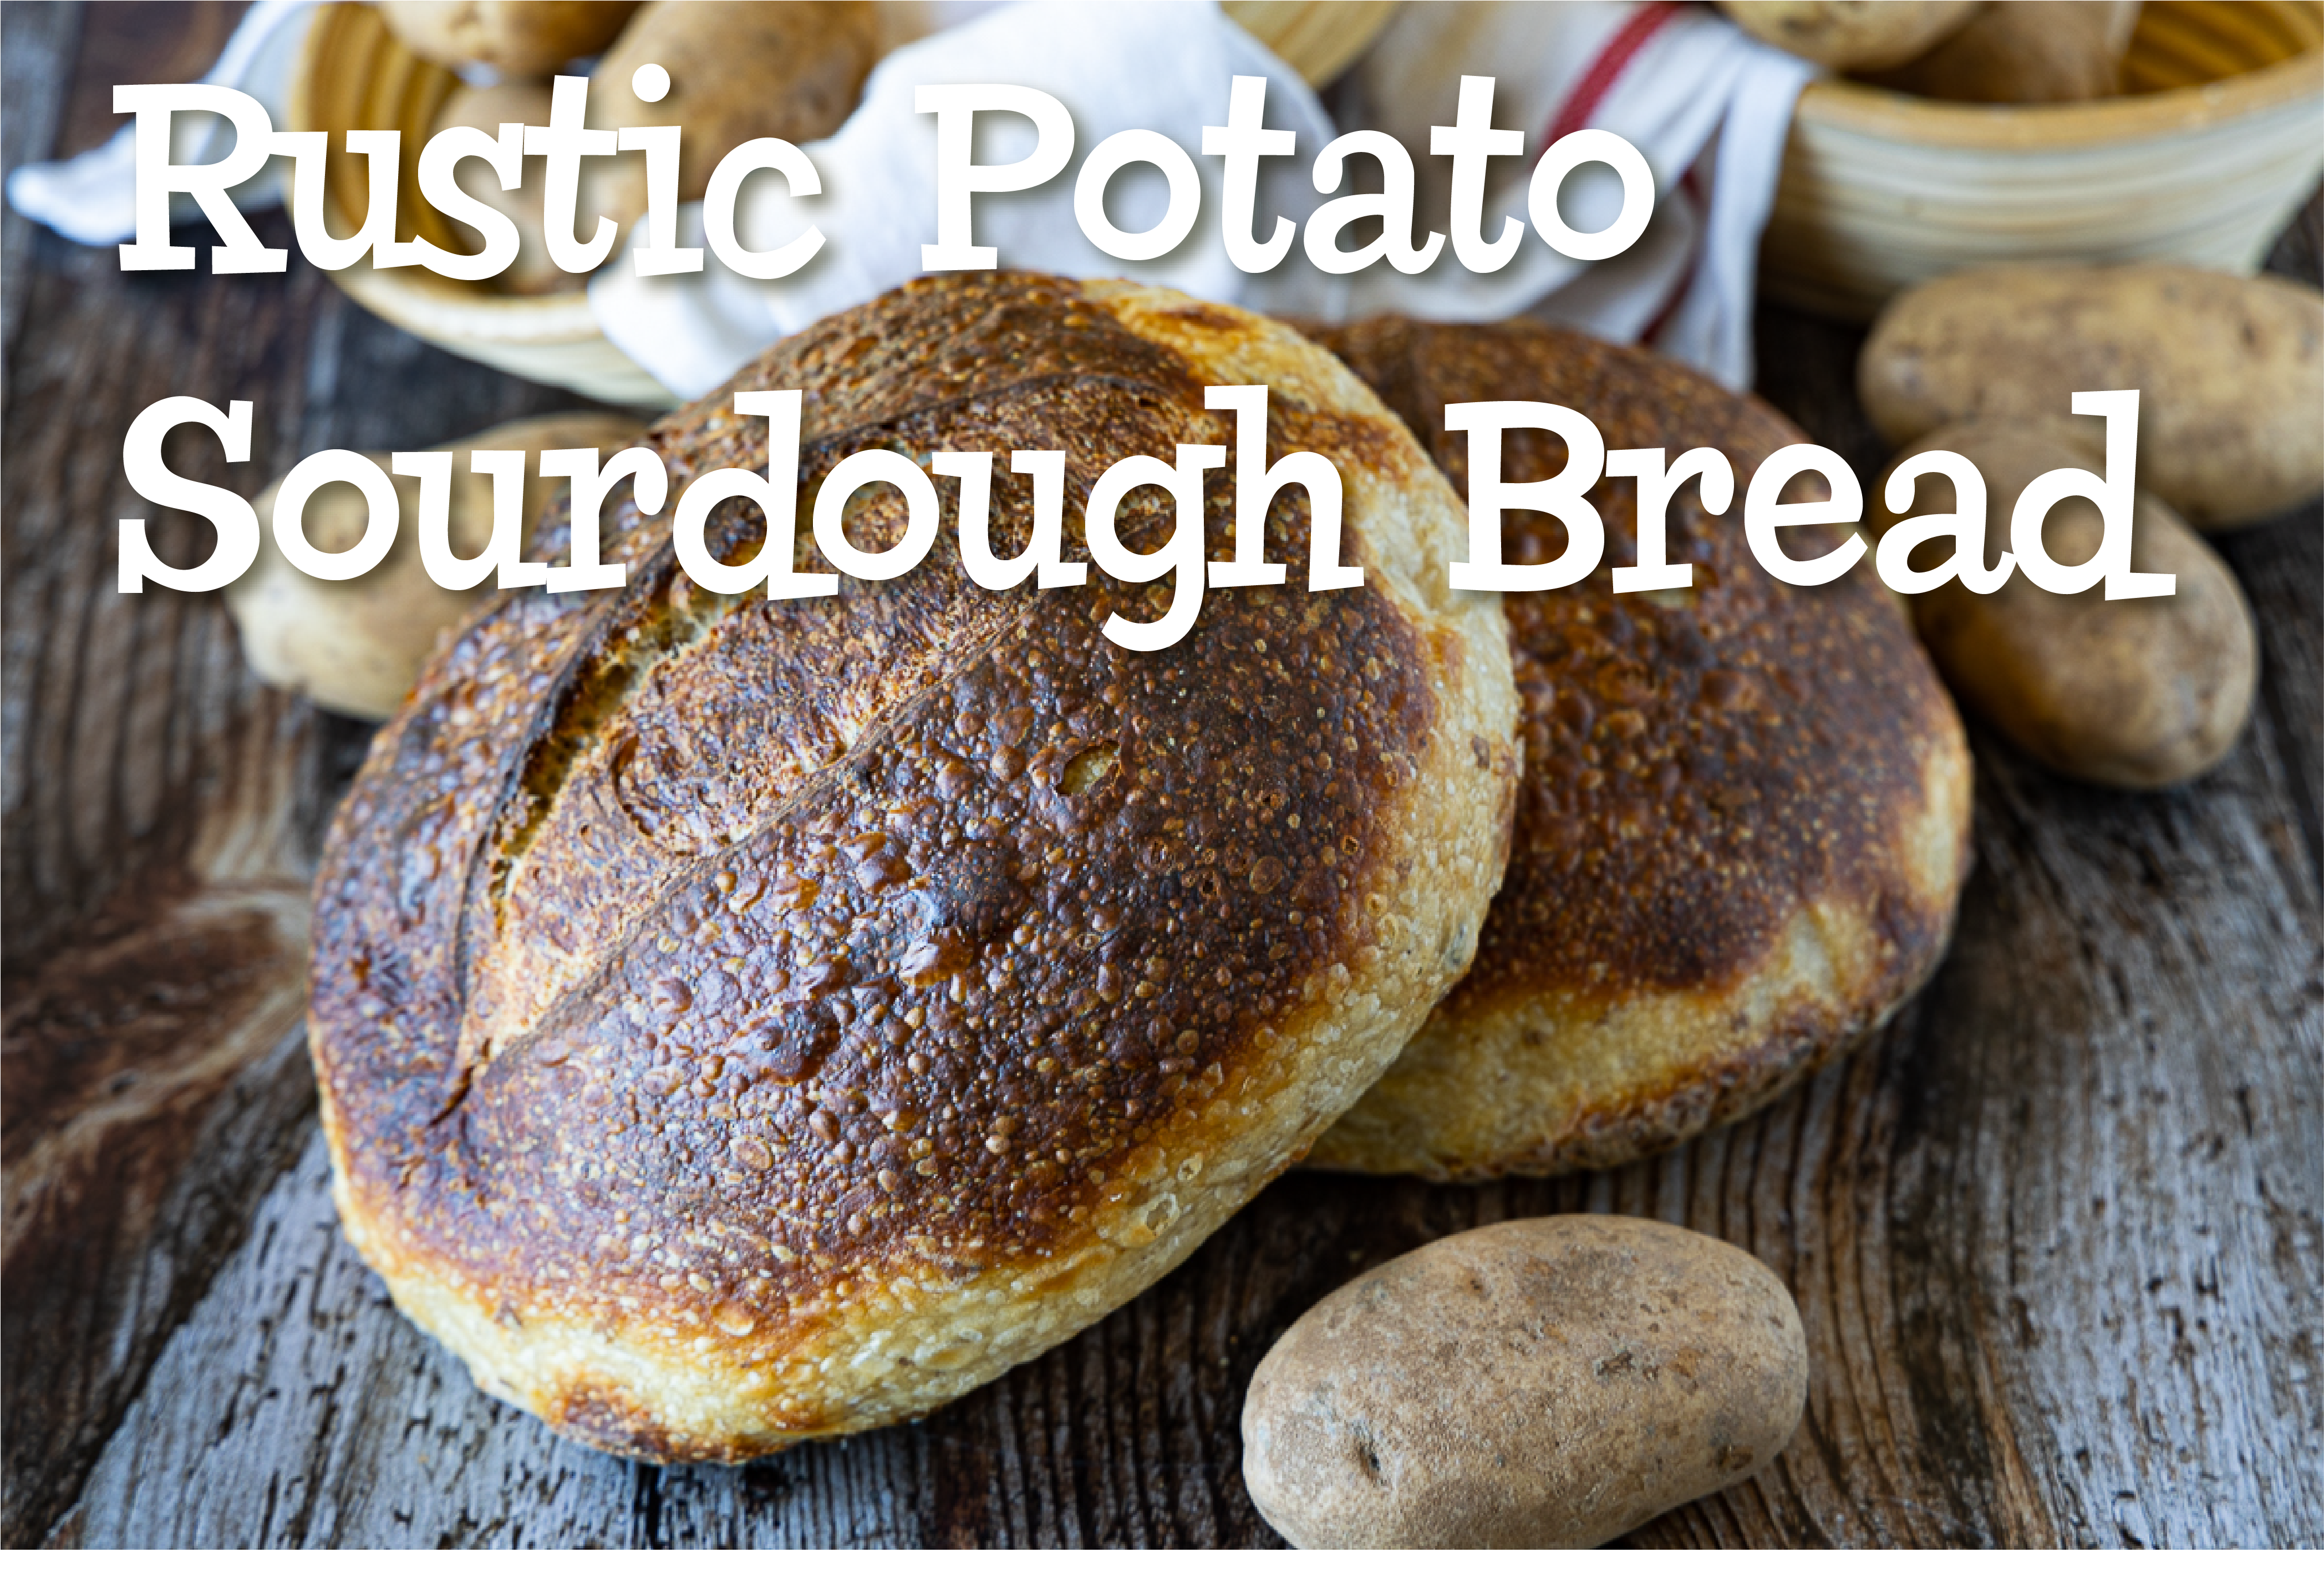
Rustic Potato Sourdough Bread is something I have wanted to do for quite a while. One of my favorite loaves of bread I have ever made was the Rustic potato bread from “Baking with Julia”. It is a fantastic recipe that always comes out delicious and is excellent to serve with dinner or have on hand for sandwiches. The flecks of potato skin give some great flavor and a little texture to make this bread unusual and very delicious. But I always wanted to try out using sourdough instead of the traditional yeast the original recipe called for. I am all about converting anything to sourdough, and this recipe was a little tricky. Still, I think I managed to convert it wonderfully. The added tang of sourdough enhanced the potato flavor, and I am very excited with the results.

As with most sourdough recipes, this is quite a long recipe with many steps. But I tried to explain in detail what you need to do, and if you take it one step at a time, it should be easy to follow. This is one of the few recipes where using a mixer is recommended. You could try and do this by hand. However, the dough will be tough to work with until the potatoes and flour come together. And even then, the dough will be sticky. This bread dough could also be converted to make fantastic hamburger buns or dinner rolls. The flecks of potato skin make them look nice and rustic, and the potatoes in the dough will help keep this bread nice and moist for an extended period of time.

Baking With Julia is one of my favorite cookbooks from when Julia Child collaborated with other chefs and bakes to help write her cookbooks. I treasure it as a wealth of great recipes that I have made over and over. I am obsessed with Julia Child and wish I could have met her when she was alive. I was close. One day, I was working just a couple of stores down from Macy’s, where she was signing cookbooks. But I didn’t know she was there until it was too late, and I missed the opportunity. Oh well! If you have not had the chance to see Julia on HBO, I highly recommend watching this series. It gives some insight into one of the best icons of the cooking world, and it is a delight to watch.

This bread really tastes like mashed potatoes. It has 1 ½ pounds of potatoes in the dough and can be a little sticky to work with. But with a little effort, it comes together into a great dough. And it is well worth the effort. This is the ticket if you want a different sourdough bread to bake. It is an excellent addition to anyone’s sourdough repertoire. Rustic Potato Sourdough Bread makes the best BLTs anywhere!

Ok, that is all for this week. Whew, this was a long post! I hope you all stay safe and healthy out in this wild world we live through. Please think of others in your choices. Together we can get through these times and emerge better because of them. Until next time!

- 1 ½ lbs. russet potatoes unpeeled (680 grams) about 4 small
- 4 teaspoons salt. Divided 23 grams
- 2 tablespoons olive oil 26.6 grams
- 4 ½ cups bread flour 540 grams
- ½ cup very active sourdough starter 150 grams
-
Feed your sourdough starter the night before.
-
Feed the starter again in the morning and let it sit to get fully active and bubbling. Depending on the strength of your starter, this could take anywhere from 2 to 5 hours. An excellent way to know it is ready is if you drop a tablespoon or so into some cold water, and it floats.
-
Meanwhile, wash the potatoes to remove any dirt. Then, with a paring knife, score the potatoes in long cuts across the entire surface in a crosshatch pattern to give you about ½ - ¼ inch or so squares on the skin.
-
Cut the potatoes into 1-inch pieces and place them in a medium saucepan.
-
Cover the potatoes with water and bring to a boil.
-
Add 2 teaspoons of the salt and continue to cook until fork tender.
-
Reserve about ¾ cup of potato cooking water and let sit to cool to room temperature.
-
Drain the potatoes and spread them out in a tray to cool and dry out for 30 minutes or more.
-
When your starter is very active and bubbling, start the bread dough.
-
Using the paddle or regular beaters, mash the potatoes in a stand mixer.
-
Change to a dough hook and add the olive oil, bread flour, remaining 2 teaspoons salt, and the sourdough starter.
-
Knead the dough for 10 minutes or so. The dough will start out very dry, and it will look like it will never come together but keep going, and eventually, the dough will start to gather into a ball. Continue to knead until the dough has formed a fairly tight ball. The dough will still be stickier than regular sourdough bread dough.
-
Scrape the dough into a non-metallic container, such as a rising bucket or ceramic bowl.
-
Cover and let rest for 45 minutes or so.
-
Do one dough fold by pulling the edges one quarter at a time towards the center to form a tighter ball. This gives the dough a moment to absorb some of the liquid and develop the gluten even more.
-
Let rise, covered in a warm place until more than doubled in size. Again, this could take anywhere from 3 to 6 hours, depending on the strength of your starter.
-
Prepare two rising baskets, either oblong or circular. You can dust them with a little flour, or I like to line them with tea towels that make sure they don't stick to the baskets. There are also ones already lined with linen.
-
Take the dough out of the container and divide it into two even pieces. Preshape them roughly into 10-inch cylinders or 8-inch rounds and let rest for 10 minutes before shaping.
-
Shape the loaves using lightly floured hands in circular motions pulling towards you to form a tight skin. For oblong form during the last big pull, pull the dough towards you, forming more of a cylindrical shape. Seal the edges into a seam. Place them seam side up into the prepared raising baskets and cover with plastic wrap or in a large clean garbage bag with no fragrance.
-
Refrigerate for 12 to 36 hours. I find they are best at around the 15-hour mark, but they are perfectly fine even at 36 hours.
-
About an hour before you are ready to bake, place two Dutch ovens, either circular or oval, into a cold oven with their lids.
-
Heat the oven to 450°F and let heat for 45 or more minutes to really get the Dutch ovens hot. Alternately you can cook the loaves on a baking stone that is also heated for an hour at 450°F.
-
Cut 2 pieces of parchment paper several inches larger than the shape of the loaves.
-
Crumple the parchment up and wet it thoroughly to create more moisture in the baking process.
-
Spread out the two pieces of wet parchment on a surface and have a lame or sharp knife handy.
-
Remove the loaves from the fridge and uncover them.
-
One at a time, remove one of the very hot Dutch ovens and its lid with potholders and place it near the work surface on heat-proof trivets or potholders. (or use the stovetop)
-
Quickly invert one of the loaves onto the center of one of the wet parchment papers.
-
Slash in one long gash along the length of the loave.
-
Lift the loaf using the paper's edges into the scorching hot Dutch oven and immediately place the lid on.
-
Put the very hot Dutch oven back into the oven and remove the second Dutch oven again using potholders.
-
Repeat with the second loaf.
-
Bake for 25 minutes.
-
Remove the lids from the Dutch ovens and continue to bake for an additional 20 minutes or so until the loaves are deep golden brown. The loaves should sound hollow when tapped on the bottom.
-
Transfer the loaves from the ovens to a cooling rack and let cool for at least an hour before cutting.

